2012-2013
I reorganized some parts of my room. Here are the latest pictures.


July, 2012
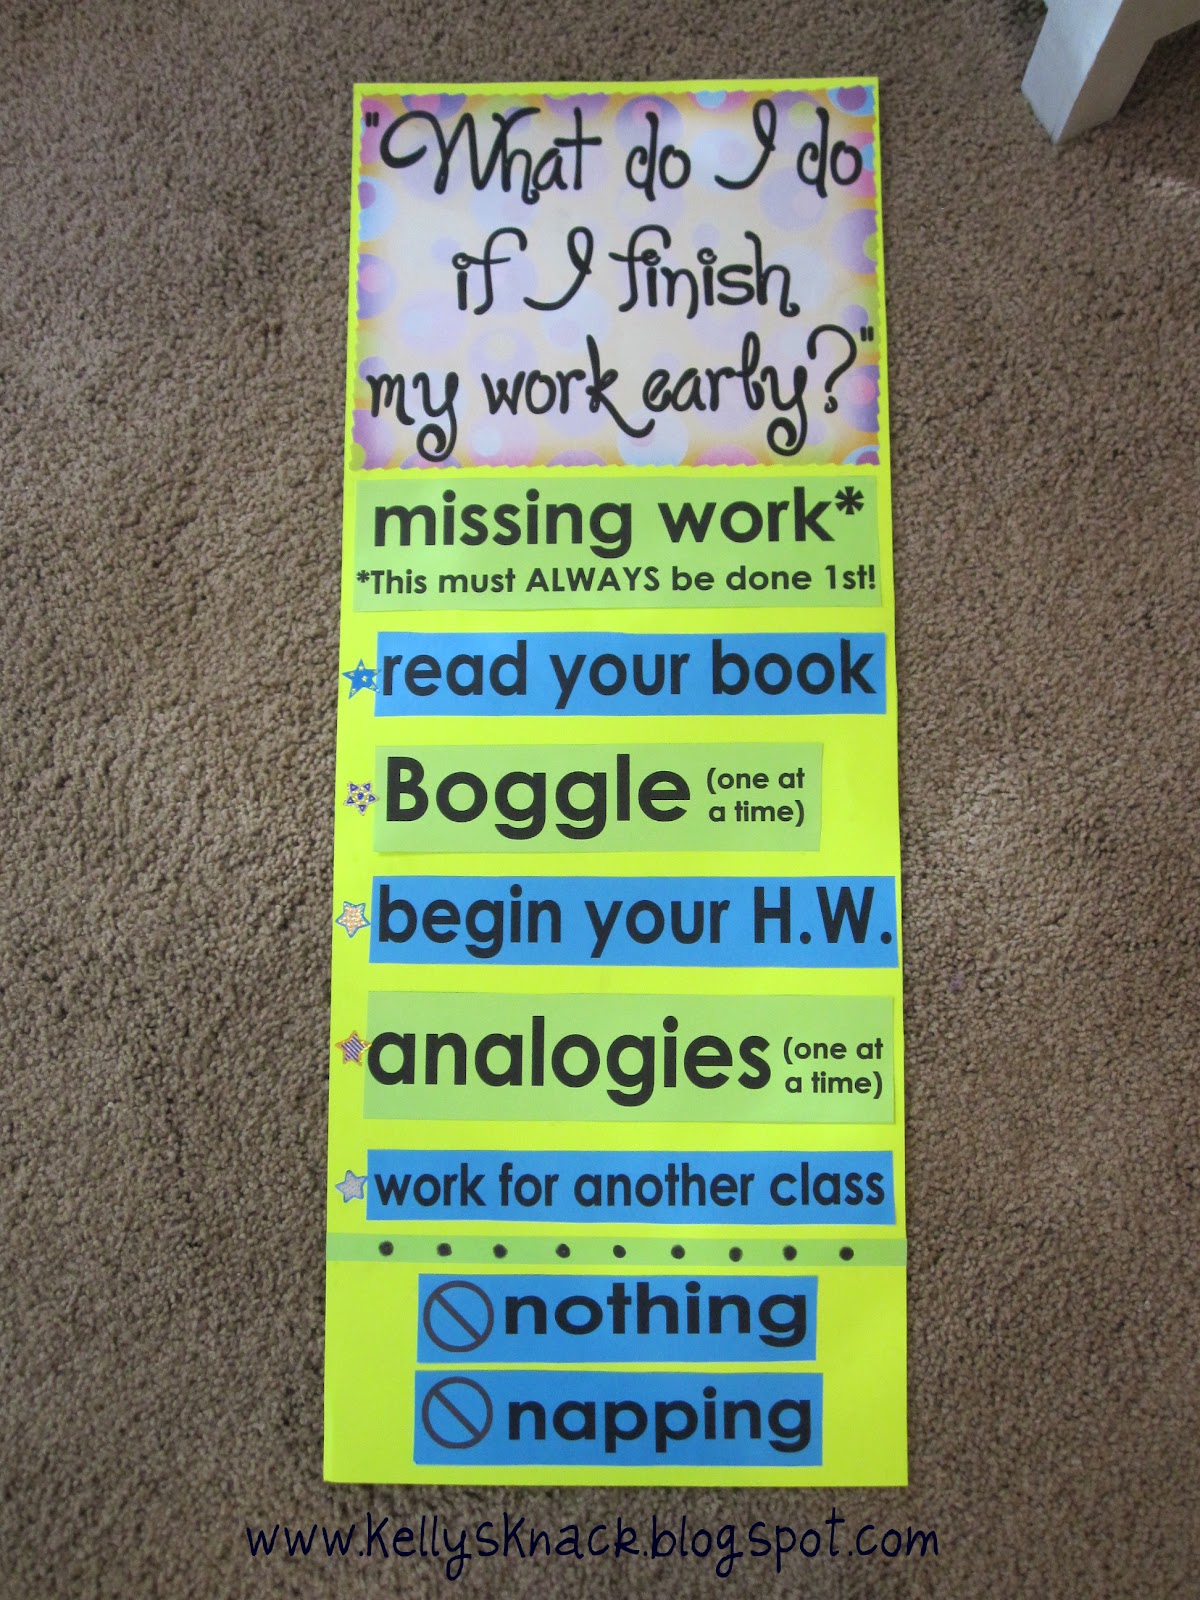
First off, I wanted to make a poster that listed all of the things to do when you finish something early. It seems like I ended up posting it on my white board everyday anyway, so now it will be in one place for the students to reference. And of course I had to mention that napping is not considered a good use of time, along with doing nothing. :)

Secondly, using the other half of the poster board, I made a packing-up checklist. Although I most always give the students a minute or two to pack-up, they seem to leave all their stuff behind. And, it bugs me when there is a piece of trash on the ground and no one picks it up. I'm going to work hard on enforcing this list, and not release them until it is done.


Thirdly, I made a pocket chart to put the Boggle and analogies mentioned on the early finishers poster. I made it out of colored manila folders and checkered duct tape. I chose the checkered because I thought the black and white would look good with the colors. And of course, I put the folders in rainbow order. I couldn't help it. #OCD The papers will slip in from the right.


And lastly for now, I made a poster to display banned words in their writing. I get so tired of reading, "He was a nice character." Why say nice when you can say amicable? What about genial? So, the words listed on the poster will be prohibited in their writing. Words going on the list include: nice, mean, said, good, very, and a lot. I have some sentence strips that I'll write the words on and laminate. Then I'll cut them and adhere them to the poster, which I will also laminate. I will probably add more throughout the year, but that's a good start for now.


Here it is with words on it. (You can see Hedwig, too!)


I had to buy this from Target. How can I resist a black, little, nerdy, fluffy cat? I couldn't.

More to come later.
Love your posters! I'm your newest follower.
ReplyDeleteColleen
Totally Terrific in Texas
Thanks, Colleen! This will be my fourth year teaching, and I've made SO MANY things for my room, but I just started posting them. When I am back in my classroom, I am going to take pictures and blog about all of them retrospectively. I hope you won't be disappointed!
DeleteLove this! Plan on making one of these 1 minute posters!! Thanks for sharing!
ReplyDeleteI am making a 1 minute poster NOW! I love it!! Could you explain how you are displaying your Boggle/analogies in the pocket chart and what font did you use for the 1 Minute poster? Love this!
ReplyDeleteamycoates@me.com
I have the same question. I like the pocket chart, but I don't quite get where the papers go.
DeleteThanks,
Dava
davasmithenglishteacher@gmail.com
Follow Dava Smith English Teacher on BlogLovin’
Sorry for the late response!! The papers go in the "slots" created by the openings on the right. Each color folder creates a different pocket. It's taped on the left, but the right is open for papers. I'll post a new picture soon! After using them for a year, they got a little saggy at the top where the holes were punched and my ribbon was holding it up. I would recommend gluing a thick cardboard across the top to prevent sagging.
DeleteI love your posters. I will be making a dismissal poster. Thanks for sharing. I am your newest follower.
ReplyDeleteKatrina
Teacherofscholars.blogspot.com
I made a modified (for my own needs) version of your dismissal poster and have posted a link to your blog from mine at http://teachingisagift.blogspot.ca. Thanks for the inspiration!
ReplyDeleteThanks Mrs. M! :)
DeleteHi Kelly! I just discovered your blog via Pinterest. You are very talented. Thank you for taking the time to share your creations!
ReplyDeleteRhonda,
Fifth grade Teacher
N.C.
Hi Kelly! I love your posters and the font you used. What font did you use in the dismissal poster? Thanks in advance.
ReplyDeleteThanks! I downloaded the font "Loyal Fame" from 1001FreeFonts.com . I can email you the PDF of the top parts if you are interested. :)
DeleteI would love a copy too! Going to try to make the posters plus the door tags before school starts!
Deletedgmzeman@yahoo.com
Keep up the great work!
Alright Mrs. Z - email sent.
DeleteThanks for the great poster ideas. Love how colourful they are.
ReplyDeleteYour ideas are simply MARVELOUS! Thank you for helping us all be better teachers! After all, reaching the children is what it is all about, and YOU are helping us do just that!
ReplyDeleteLove the poster ideas! I just made a 1 minute dismissal checklist for my 4th graders.
ReplyDeleteErica
Shepherd's Shining Stars
Awesome! It worked SO WELL with my 7th graders. The first couple of weeks was a bit annoying since I had to remind them what was on it and what to do, but after a while, it was a habit that was TOTALLY worth nurturing. I rarely had any lost and found or trash on the floor when they were dismissed and they rushed to the door. :)
DeleteHI. I love your poster, what to do when you finish early. May I ask a few questions to hopefully help me manage my classroom? What do you do with the boggle sheets students complete? or how are those checked? graded? or is it just for fun? I really like this idea. Second question, what do you use for your analogies? You have that listed as one of your activities to complete if finished early. Just wondering how that is organized, set up, and what kind of materials do you use for this? Thank you for the wonderful tips :)
ReplyDeleteHi Susan! Boggle first:
DeleteBoggle was a big summer project for me, but it was totally worth it when it was finished. I used wordtwist.org to generate some boards. Then, to make sure there were lots of possibilities, I checked it with http://www.cse.unr.edu/~cohen/bogl.php . If there were lots of words, I put it in my document. (The document was a half sheet with a boggle board, numbered blanks, and labeled with the marking period and week at the top.) I made 36 boards on 13 pages.(6 6 week terms.) I made it so they had to have at least 25 words for extra credit. In terms of checking it, I just glanced at the words to make sure they were actual words. If they completed all the boards for the 6 weeks, I added it to my extra credit column in my grade book. At the new 6 weeks, I took the old boards away and added in the new ones. It was VERY low maintenance once they were made, copied, and cut. It does take a little effort to get it all set up. I am thinking about updating my boards and putting them on Teachers Pay Teachers.
Analogies:
Confession: I never got these off the ground! :( Same kind of system, though. I would have half sheets with about 15 analogies on there. I would only accept all 6 being finished by the end of the 6 weeks, stapled, and turned in at once. A colleague of mine had a skills workbook, and I went through and copied all the pages. I then cut them up and matched them up by size. They were all different sizes!) I have copies now, but they are not labeled yet. I think you could get an analogy workbook of sorts and copy those pages, and maybe do some manual cutting and taping and copying.
Keep me updated! I hope it all works out! To reiterate, it's a lot of work at first, but the reward and payoff is TOTALLY worth it!
Great ideas!!! Thank you for sharing them with me. I am very interested in the boggle for my 7th graders and I love that it's extra credit. I plan on getting this together for my class. Thanks again for sharing and if you put it on teachers pay teachers, I'll be looking for you!
ReplyDeleteThanks, Susan! I hope you do! Like I mentioned above, it's a big job to get it set up, but it's worth every minute!
DeleteI have a question about your desks in your photos... what are on the bottom of the legs? Is it to help them move easier? My floor was just waxed and looks fabulous, but at the end of last year it looked like CRAP! Apparently they have sliders on them for carpet rather than linoleum. Just was curious! Thanks!
ReplyDeleteHi Linds,
DeleteYes, the colored felt on the bottom of the feet help the desks slide smoothly on the floor. I bought 8.5" x 11" sheets of felt from the local craft store. I just quartered each sheet, meaning I got four feet out of each sheet. I tipped the desk and rubberbanded the felt onto each foot. I chose the rainbow colors for two reasons. 1) Obviously I love colors. 2) When we group up and un-group throughout the periods, my kiddos know where to put the desks back. I am kind of picky with my lines! It takes about an hour or so to cut the felt, flip the desk row down, band all four feet, and flip the desk row up. It is one hour a year, and not hearing the SCREEEEEEEECCCCHHHHH 50 times a period 6 times a day is worth it to me! And, like you mentioned, it keeps the floors in better shape and the janitorial staff likes me for it. :)
I love the version of the poem you have on your door. Can you share where you got the template?
ReplyDelete