Sunday, November 27, 2011

T-shirt Upcycle


Bleach Design T-Shirt


I came across the idea for this on Pinterest, my newest inspiration for recipes, crafts, and decorating.  My husband and I went to the J.Crew warehouse sale on Black Friday, and we scored some great deals! 


Side note about the sale:
The sale is in Lynchburg, VA, in a large warehouse, with hundreds of boxes.  They only let 200 people enter at a time, so you need to get there early and wait in line.  If you're not in the first group, you end up waiting HOURS until people start to leave.  Once you're in, the boxes aren't organized at all.  You go in, choose a box that's not "taken," and rummage. I forgot to mention that as you enter, they hand you a price list and a trash bag - that's right - to gather your clothes.  So you go through box after box after box, looking for anything you like that happens to be in your size.  Surprisingly, my large bag always fills up quickly.  Then, when you have gathered a lot of options, you find a spot that is as out of the chaos as possible, and you start sifting.  Some of the clothes are damaged, and you can throw them out in the first round.  There are no dressing rooms, so if you want to try things on, you need to wear a tank top and leggings, and try it all on over-top of your clothes.  You do a preliminary downsizing of your things, then go back to the rummaging.  Continue the cycle as many times as necessary.


I was on the look out for some cute t-shirts (which were $5.oo!) that I could bleach.  I found 2 solid-colored, V-neck shirts. I had already purchased the bleach pen from WM. (Make sure it's for whites!)  I first put a piece of cardboard in my shirt, to prevent the bleach soaking through.  I then drew my design out in chalk.  Well, it didn't write very well, but I got the major shapes down.  I then started at the top, and just drew!  Sometimes it bubbled, but I had a paper towel handy to just wipe the tip off and continue on.   In the picture below, you can see some of my chalk lines and the wet gel.


I let it sit for about 20-30 minutes, rinsed it off in the bathtub, then stuck it in the washer machine.  I love it!  I did a side design (modeled after one I saw on Pinterest) for this shirt.  I plan on doing a front design on the other shirt I got.  I'm just waiting for the perfect inspiration.   These pictures show the design in a more yellow light; the true coloring is seen on the dress form.


Pico de Gato wanted to help. :)


Tadaa!  The best part is that it took 30 minutes total, including sketching, tracing, and rinsing.

Monday, October 3, 2011

Etsy Coupon Code

To my faithful blog followers:

I wanted to say thank you for following my blog by offering you a coupon code to my Etsy shop.  If you are a follower, and you type in "ILoveTheBlog" at your checkout, you can save 10%!  I have recently posted new items for sale.  

Your support means the world to me.

Love,
Kelly

Monday, September 12, 2011

Gadgets need cozy homes!

iPhone pouch

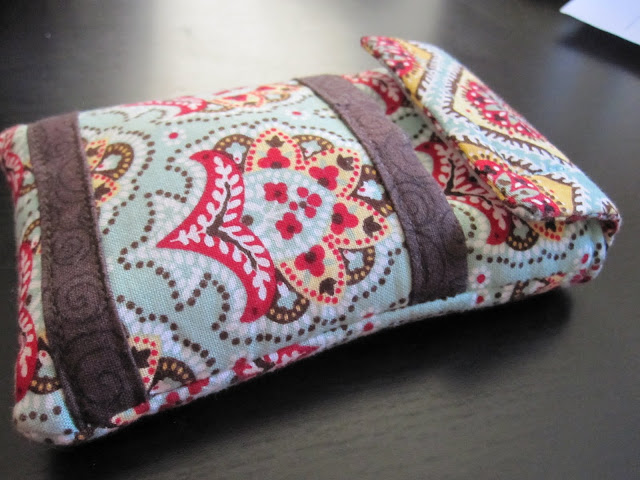
Every new gadget needs a cozy home in which to live.  When I got my iPhone (for the games), I immediately drafted a pattern and made it a pouch.  (Well, as soon as I could.  I had to wrap it in muslin for a couple days until I made my pouch pattern and was able to make it.  It looked like a mummy, and I looked like a dork.)


I made my own bias tape for it from pleated bag leftovers, and used some coordinating fabric I had picked up on clearance at Joann's.  I created a pocket for my headphones, so I can have them on hand when I want to use it as an iPod.


I also got some clear vinyl for the ID holder.  It's a good grab-and-go pouch!


Anyway, this little pouch keeps my iPhone scratch free.  I like to think that my phone and pouch are BFFs.  I know that I am personifying these inanimate objects too much, but I really like them.


I made another one to sell,but it took a long time.  I think I am going to add a wristlet on the next ones I make.  I think they would be good for my Etsy store!


A Birthday and Laptop Sleeve


Laptop Sleeve with matching Accessory Pouch


My dear friend Lorin had a birthday recently, and I made her a laptop sleeve and a matching computer accessory pouch.  I bought pre-quilted, double-sided fabric to use.  I got a half yard, which left me with enough left over to make an accessory pouch.  (I even have a little bit left!)  As you can see, it's the same fabric I used when I made a tote bag in the spring. 


I have made laptop pouches twice before, but this was the first set with a matching pouch.  I thought the pouch would be good for the charger, USB drive, headphones, etc.  I want to go back and make one for my other two sleeves!  One day...


It closes with velcro.  I couldn't find sew-in, navy blue velcro in town, so I had to settle on black.  Although it is taboo to mix black and navy, it surprisingly looked better than white or tan.


I used purple bias tape for the edging.  I also used it to cover my zipper and side seams in the pouch.   This is a view of the inside, so you can see the bias tape.  


And here's a close-up with some accessories.


I think it looks nice with the laptop peeking out.


Anyway,  I think it turned out very nice.  I might try and sell them! :)


Sunday, August 7, 2011

Re-creation of an Anthro find


Antrhopologie Pillow


Anthro version:


my version:


I found this Anthro pillow copy tutorial through a blow I follow, called Adventures in Dressmaking.  I was inspired to make my own!  I love the Anthro version, but NOT for $88.00.


One of the things that attracted me most to this project was the idea of using up a lot of the tiny scraps that I save from project to project.  I never know what I will use all of it for, but for some reason I still save it all.  This pillow required having a stash of different and varying fabrics, so it was a perfect discovery.


I followed the techniques of the tutorial linked above.  I used a light-weight fusible interfacing on the back of the main fabric, but I didn't fuse it until part way through sewing the petals on.  In retrospect, I should have fused it before I started sewing to reinforce the thin muslin.  Cutting out the shapes took a while, but I just popped in a movie and took my time sifting through my scraps and cutting out the shapes.  I just kind of eyeballed the shapes of the petals, so they are all slightly different.  I used a glue stick to temporarily adhere the petal to the muslin.  When I had all of the petals cut and glued, I top-stitched the petals on with a zigzag stitch, as you can see more clearly in the pictures below.  I didn't sew around each petal, but instead went around the whole flower's circumference by layer.  That choice saved a lot of time and thread.


The pillow has orange cording around the edges, and a sham back instead of a zipper.  I used bias tape to cover the raw edges on the back sham pieces. Right now I only have one pillow, but I think it needs a matching friend.  That means I need to go to Ikea and get some more inside pillows to cover.  Oh darn!


One of my favorite things about the pillow, is that each of the fabrics on it has a story.  I can look at it and think about all the people I made things for with that particular fabric.  If you go back through my projects in older blogs, you'll see where a lot of the fabrics came from.  Do you see the fabric I used to make you something?


Sunday, July 17, 2011

More Etsy Updates

P

leated Bags on Etsy


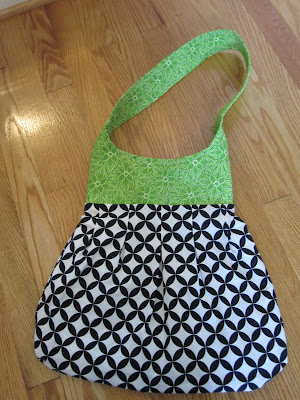
Here are the bags that I've made this summer to sell on Etsy.  If you see one you like, hop on over to my Etsy shop!  If you sign-up to be a follower of my blog (or you already are one), I'll give you 10% off of the price! :)  There are more pictures in there too, so you can see the coordinating lining fabric, as well as the snap and pockets.


(Update: This bag is SOLD to Gretchen!)


I've also made some pot holders.  


I think I'm going to make an e-reader pouch/holder.  Anything else you'd like to see in there?

Saturday, June 25, 2011

Etsy updates

E

tsy


I've been working hard on my etsy shop. I've been focusing on building up inventory, and making the surprise give-away item to include when someone orders something.  I'll put these in the order when I pack it up.  I'm also going to include a coupon when I pack up the orders, for savings on the next order.  I started first with adding new keychains to my shop.  I've made 3 new pleated bags that I need to photograph and post for sale.  I also think I'm going to have little items, like some potholders, bookmarks, and other things; ways that I can work on decreasing my scrap abundance.  I need to work on advertising with people I know and spreading the word that way.


I am going to do custom orders based on the webbing and ribbon choices pictured in the last two photos.

Potholders

B

elated or early?


front view above, and back view below


I purchased the materials for this project intending it to be a wedding present for Keith and Lucy.  Well, when it didn't get done immediately, it kept losing its position in my craft queue.  I made them about a month or two ago, just in time for it's purpose to be ambiguous.  Is it a belated wedding present, or an early first anniversary present?  


Krista's Baby Shower

K

rista's Baby Shower


My mom and I hosted a baby shower for my friend Krista.  I met Krista growing up at my home church in Richmond.  We became good friends through the small group that we were both in during high school.  My mom and I invited all of the small group members, as well as their mothers to this shower.  My group had not been all together since we all graduated, so it was a really special time to catch up with one another.  


My mom and I had a lot of fun throughout the whole shower process.  We started by making the invitations for the shower.  Each of them were unique.


We used stamps and stamp pads, tools that cut special edges and corners, and coordinating paper, along with the usual fare of scissors, glue, and pencils.  Our front stamp said, "Happy Pregnancy" with a round-bellied dress on a hanger, as you can see below.


After we had sent the invitations, we started planning the party.  We each made some decorations.  I made the bunting to hang from the entry way of my parents' house and to welcome everyone.  The mom and dad-to-be named the baby Kassie.  We were able to incorporate that throughout the decorations and the party.


Another paper craft we did was to make some paper diapers to hang with tiny, colored clothespins.  I got this idea from my friend Kat at Danielle's shower.


We also had a prayer/message tree, where the guests could write messages to expecting family.  My mom and I used hot glue to decorate the branch we foraged from the back yard with little coral flowers.  The messages are attached with little, calla lily, bendable flowers.  (We got the flowers and the bendable flowers from Michael's.  They came in a bunch, and we just cut them off of/out of their bunch.  That really stretched money!  It was only a dollar for each bunch.)  The branch is sitting in a vase filled with marble rocks to stabilize it upright.  The bunny was holding the directions and the basket for the attaching flowers.


The completed tree was really special to send home with Krista.  We also had a small stuffed-animal tea party as a center piece for one of the tables.   


Since daisies were one of Krista's wedding flowers, we incorporated them in our decorations.  We had small jars each filled with colored water.  The daisies looked very cute in the different shaped and colored jars!


It seems I missed taking a picture of the food and cupcakes.  I was able to use my cupcake tree to display the cupcakes.  I just made chocolate cupcakes from a box mix, and we iced them with Ukrop's white, butter-cream, icing.  If you're a Richmonder, you know how good the food from the Ukrop's bakery is.  Another nice aspect of the shower was that we were also able to reuse a lot of things we had made or purchased for my wedding.  We used glass marbles, table clothes, and serving trays.

It was really fun to plan and execute a shower with my mom.  We had a lot of fun making most everything, and I think it all flowed together.  I know it was special to me to get to reunite with close friends from high-school, and I think everyone enjoyed it, too.